At STEMCO, we have a rich history of manufacturing the best seals, hub caps, bearings, axle fasteners, and king pins in the industry. Nothing is more important to us than having our customers experience the safety, performance, and confidence of having high-quality STEMCO components on their trucks.
This is especially true when it comes to hub caps. The hub cap endures constant physical abuse from the elements and internal factors that can affect its characteristics both visually and functionally. STEMCO hub caps are engineered to keep equipment on the road and keep contamination out of wheel ends.
The purpose of this tech tip is to inform customers of proper installation and troubleshooting methods for our STEMCO hub caps. We will be referencing the following STEMCO PDFs:
Proper Hub Cap Installation Procedures
STEP 1
Check the mounting surface of the hub, making sure to clean off old gaskets and sealant. Also, check for any burrs or imperfections that might prevent a proper gasket seal.
STEP 2
Make sure all components are free of any dirt or grit.
STEP 3
Always install the hub cap with a new gasket.
STEP 4
Split washers are recommended to lock the flange bolts in place.
STEP 5
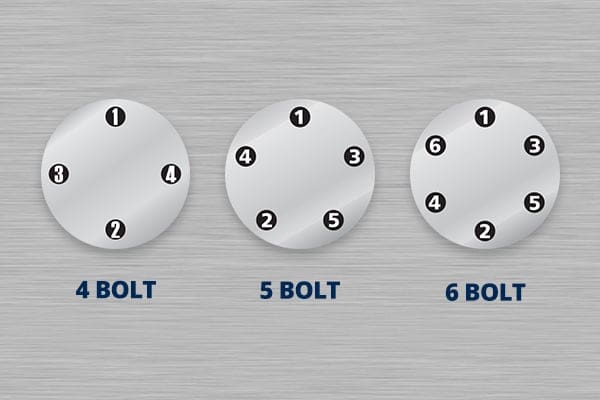
Initially hand tighten the hub cap (see bolt tightening sequence below) and finally torque to the recommended specification.
STEP 6
For the threaded Pro-Par caps, lightly lubricate the threads and O-ring and install the hub cap. Refer to the torque specifications for the recommended torque value for threaded hub caps.
STEP 7
For oil applications, fill to the recommended level and re-check after the lube has had adequate time to establish its final level.
Window Kit Replacement Procedures
STEP 1
Remove the old window ring using a #8 Torx driver.
STEP 2
Thoroughly clean the hub cap and window ring leaving the window ledge free of oil and the mounting surface of the window ring clean and free of any old gasket material.
STEP 3
Place the new window gasket in the hub cap casting, and insert the new window with the window ring and window ring gasket in place.
STEP 4
It is recommended that screws be replaced with new ones. Once the screws have been started and pulled down, begin tightening with a cross hatch pattern to evenly distribute the load. Refer to the Torque Specifications for the proper torque. It is recommended that hand tools be used for this procedure, as power tools may over-torque the screws and damage the threads.
STEP 5
The hub cap is now ready for installation.
| Hub Cap Torq Specs | |||
|---|---|---|---|
| Threaded Hub Caps | |||
| Part No. | Torq | ||
| XXX-4075 | 100 ft/lbs | ||
| 3040-4975 | 50-60 ft/lbs | ||
| 304-04976 | 50-60 ft/lb | ||
| 640-0003 | 50-60 ft/lbs | ||
| Hub Cap Components | |||
| Part No. | Type | Torq | |
| 359-6032 | #8 Torx Screw | 18-23 in/lbs | |
| 359-5984. | 3/8″ Mag Plug | 5-9 ft/lbs | |
| 359-5985 | 3/8″ Pipe Plug | 5-9 ft/lbs | |
| Hub Cap Mounting Bolts | |||
| Size | Torq | Size | Torq |
| 1/4″ | 8-12 ft/lbs | 5/8″ | 22-26 ft/lbs |
| 5/16″ | 12-16 ft/lbs | 3/4″ | 24-28 ft/lbs |
| 3/8″ | 16-20 ft/lbs | 7/8″ | 26-30 ft/lbs |
| 7/16″ | 18-22 ft/lbs | 6mm | 8-12 ft/lbs |
| 1/2″ | 20-24 ft/lbs | 8.5mm | 12-16 ft/lbs |
If you would like more information on STEMCO hub caps, visit our product page.
To access our full library of Tech Tips, click here.
For in-depth articles covering industry news and trends, product spotlights, case studies, customer insights, and “thought leadership” topics from STEMCO professionals, visit The Wheelhouse Blog.


