Chez STEMCO, nous avons une riche histoire de fabrication des meilleurs joints, enjoliveurs, roulements, fixations d'essieu et pivots d'attelage de l'industrie. Rien n'est plus important pour nous que de permettre à nos clients de bénéficier de la sécurité, des performances et de la confiance que procurent des composants STEMCO de haute qualité sur leurs camions.
Cela est particulièrement vrai lorsqu'il s'agit d'enjoliveurs. L'enjoliveur subit des abus physiques constants de la part des éléments et des facteurs internes qui peuvent affecter ses caractéristiques tant visuelles que fonctionnelles. Les enjoliveurs STEMCO sont conçus pour maintenir l'équipement sur la route et empêcher la contamination des embouts de roue.
Le but de cette astuce technique est d'informer les clients des méthodes d'installation et de dépannage appropriées pour nos enjoliveurs STEMCO. Nous ferons référence aux PDF STEMCO suivants :
Procédures d'installation appropriées du capuchon de moyeu
ÉTAPE 1
Vérifiez la surface de montage du moyeu, en veillant à nettoyer les vieux joints et produits d'étanchéité. Vérifiez également l’absence de bavures ou d’imperfections qui pourraient empêcher une bonne étanchéité du joint.
ÉTAPE 2
Assurez-vous que tous les composants sont exempts de saleté ou de graviers.
ÉTAPE 3
Installez toujours le capuchon du moyeu avec un joint neuf.
ÉTAPE 4
Des rondelles fendues sont recommandées pour verrouiller les boulons de bride en place.
ÉTAPE 5
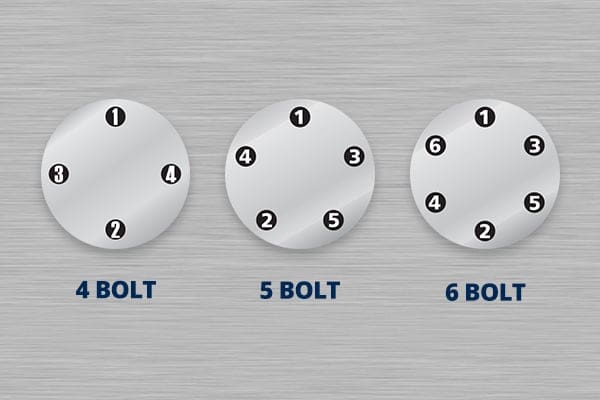
Serrez d'abord à la main le capuchon du moyeu (voir la séquence de serrage des boulons ci-dessous) et enfin serrez au couple recommandé.
ÉTAPE 6
Pour les capuchons filetés Pro-Par, lubrifiez légèrement les filetages et le joint torique et installez le capuchon de moyeu. Reportez-vous aux spécifications de couple pour connaître la valeur de couple recommandée pour les enjoliveurs filetés.
ÉTAPE 7
Pour les applications d'huile, remplissez jusqu'au niveau recommandé et revérifiez une fois que le lubrifiant a eu suffisamment de temps pour établir son niveau final.
Procédures de remplacement du kit de fenêtre
ÉTAPE 1
Retirez l'ancien anneau de fenêtre à l'aide d'un pilote Torx #8.
ÉTAPE 2
Nettoyez soigneusement l'enjoliveur et l'anneau de fenêtre en laissant le rebord de fenêtre exempt d'huile et la surface de montage de l'anneau de fenêtre propre et exempte de tout ancien matériau de joint.
ÉTAPE 3
Placez le nouveau joint de fenêtre dans le moulage du capuchon de moyeu et insérez la nouvelle fenêtre avec l'anneau de fenêtre et le joint d'anneau de fenêtre en place.
ÉTAPE 4
Il est recommandé de remplacer les vis par des neuves. Une fois les vis démarrées et abaissées, commencez à serrer avec un motif de hachures croisées pour répartir uniformément la charge. Reportez-vous aux spécifications de couple pour connaître le couple approprié. Il est recommandé d'utiliser des outils manuels pour cette procédure, car les outils électriques peuvent serrer trop les vis et endommager les filetages.
ÉTAPE 5
L'enjoliveur est maintenant prêt à être installé.
| Spécifications de couple du capuchon de moyeu | |||
|---|---|---|---|
| Enjoliveurs filetés | |||
| Numéro de pièce. | Couple | ||
| XXX-4075 | 100 pi/lb | ||
| 3040-4975 | 50-60 pi/lb | ||
| 304-04976 | 50-60 pi/lb | ||
| 640-0003 | 50-60 pi/lb | ||
| Composants d'enjoliveur | |||
| Numéro de pièce. | Taper | Couple | |
| 359-6032 | Vis Torx #8 | 18-23 po/lb | |
| 359-5984. | Prise magnétique 3/8″ | 5-9 pi/lb | |
| 359-5985 | Bouchon de tuyau 3/8″ | 5-9 pi/lb | |
| Boulons de montage du capuchon de moyeu | |||
| Taille | Couple | Taille | Couple |
| 1/4″ | 8-12 pi/lb | 5/8″ | 22-26 pi/lb |
| 5/16″ | 12-16 pi/lb | 3/4″ | 24-28 pi/lb |
| 3/8″ | 16-20 pi/lb | 7/8″ | 26-30 pi/lb |
| 7/16″ | 18-22 pi/lb | 6mm | 8-12 pi/lb |
| 1/2″ | 20-24 pi/lb | 8,5 mm | 12-16 pi/lb |
Si vous souhaitez plus d'informations sur les enjoliveurs STEMCO, visitez notre page produit.
Pour accéder à notre bibliothèque complète de conseils techniques, Cliquez ici.
Pour des articles approfondis couvrant l'actualité et les tendances du secteur, les produits phares, les études de cas, les informations sur les clients et les sujets de « leadership éclairé » rédigés par des professionnels de STEMCO, visitez Le blog de la timonerie.


