So, you think it might be time for new king pins and you need to know how to use a king pin kit. At STEMCO, we strive to give you the resources and tools you need to perform safe and effective installations of STEMCO products. With the quality and durability of STEMCO products and proper installation procedures, we can protect your equipment, minimize downtime, streamline processes, and keep the roadways safer.
When is it time to change your king pins?
- Look for unusual wear on your tires. A worn king pin creates an inconsistent camber angle resulting in one-sided wear, feathering, and diagonal wear patterns.
- Unusual sounds, like clanging/popping or grinding, can arise from the steering knuckle/king pin assembly. These sounds can be heard during turning and front axle bounce during normal operation if the king pins or bushings are excessively worn due to improper fit between the king pin, the bushing, and the steering knuckle.
- Steering issues, as though the vehicle is pulling to one side and driving itself – Steering issues can be extremely dangerous, as they may delay driver response time, create an overcorrection response, and contribute to driver fatigue. Hazardous road conditions also accentuate this problem.
Let’s talk about STEMCO’s solutions.
Our Stemco Kaiser king pin sets have been manufactured for more than 58 years, so you can trust that they can stand the test of time. The consistent testing that has been performed for more than four decades has led to nearly zero warranties. And beyond the quality, the Kaiser QwikKit king pin kit makes installation much easier and quicker and does not require reaming. There are duplicates and knock-offs out in the market, but they can’t replicate the quality and ease-of-use of STEMCO. The imitation products may look similar; however, they do not provide the 2–3x life cycle QwikKit provides over standard king pin kits. STEMCO Kaiser offers the industry’s best application coverage and ships from our U.S. manufacturing facility.
Below is a step-by-step summary of properly disassembling your existing King Pin Kit and assembling your new STEMCO Kaiser King Pin Kit. To watch an installation of king pins, view our King Pin installation video.
How to disassemble the existing King Pin Kit:
- Put on PPE, including safety glasses and gloves.
- Chock the wheels to eliminate the vehicle moving during the repairs.
- Lift the front axle safely, and place the jack stands in the proper position to lift the axle to remove the front wheel.
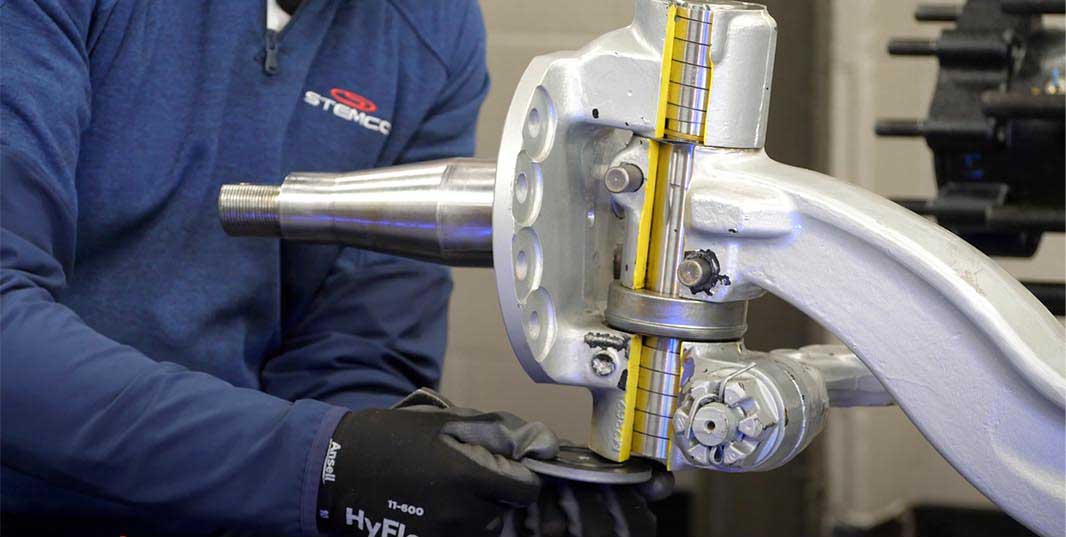
- Check the king pin with a magnetic dial indicator with the base attached to the axle and the dial head along the backside of the spindle, looking for anything over .01” of movement.
- Remove all the brake and hub assemblies.
- Remove end caps from the top and bottom of the king pin.
- Remove draw keys or lock pins. Please note their location to go back the same way during installation. You shouldn’t need heat or power tools. It should just take a “punch” with a brass hammer.
- Remove the king pin with a brass hammer and bushing driver. Although, some may need a press to remove it (like the STEMCO QwikeXtract Removal System).
- Remove the spindle without dropping the bearing or the shims.
- Make a note of how many shims you have. You will use the same amount of shims during installation. You will need to add shims to make up for the wear that has caused you to replace the king pins.
- Inspect the axle eye using STEMCO kit STK81, No-Go Gauge kit, and clean it up, verifying that there aren’t any burrs inside. If the axle needs a repair or replacement, the No-Go Gauge will identify out of round condition.
- Measure the axle eye with a T-Gauge and Micrometer at 12 and 6 o’clock and again at 3 and 9 o’clock. Measure at both top and bottom of the bores. You can also use a Go-No-Go Gauge with the kit. (Note: The specs for the axle eye are on page 27 of the Kaiser catalog. Make sure the bores of the axle eye and spindle bores are within the specification parameters on page 27
- Remove bushings. If it’s a spiral bushing, use a screwdriver and a T-handle tool and twist clockwise while carefully pulling in the same direction.
- Use a bushing driver and a brass hammer to remove the lip seal. Dispose of the lip seal; you’ll use a new one during installation.
Do the same process of steps 9–12 on the spindle eye.
How to assemble your new STEMCO King Pin Kit.
- Clean the axle eye and spindle bores with a brake cylinder hone or emery cloth to remove any contamination.
- Install the new lip seal by putting the lip seal on the bushing driver. The open end of the seal should be facing the axle.
- Hammer it in, so it’s almost flush with the end of the spindle bore.
- Install the new spiral bushing, starting at an angle by hand. Finish it off with a T-tool or brass hammer.
- Test fit the king pin before you install it. Make sure it goes in each end, and then try it all the way through.
- Make sure it says “top” on the top of the king pin, and have it facing the wheel end so that the keyways line up.
- Use the same number of shims as previously, and add a .005″ shim.
- Install the king pin, spindle, and shims onto the axle eye, letting the pin slowly slide into the axle eye
Install the bearing as you put the king pin in. The bearing should be pre-packed with grease and installed with the open side facing down. It should fit snug; install it with the ball of your hand. DO NOT TAP ON THE BEARING WITH A HAMMER.
Install the new lock keys the same way you removed them, and torque them to 40 ft/lbs. - Reinstall the new end caps with o-rings. Tighten until lock washers are flat against the surface
- Pump grease into it while moving the spindle back and forth 4 or 5 times until you see grease come out just between the spindle and the axle.
- Continue installing the hub assembly, adhering to the TMC recommended procedures.
- Install your brake assembly, put the wheels back on, and torque the wheels to the manufacturer’s recommendations
- Lastly, measure king pin movement again using a dial indicator. Movement should be very minimal .001-.003
We can provide assistance in several ways to help you throughout the process.
We have a chat feature located on the homepage of our website, www.stemco.com.
Customer service and tech line phone/fax numbers can be found here https://www.stemco.com/company/contact/.
Contact information for sales representatives based on the geographical area can be found on our website here, https://www.stemco.com/company/contact-a-sales-representative/.


